Hints and Tips For your Lemax Village
Scale
Lemax Village buildings and the figures are not the same scale. Just compare the height of a figure and the front door of any of the buildings. No way will the figures get through the door!
What Lemax has done by using the size of the figures they have is to add expression and atmosphere to the scenes. If the figures had matched the buildings a lot of the whimsical feel of the village would have been lost.
The different scales just need to be seperated with the figures in the foreground with a backdrop of the buildings and trees.
In a technical sense the buildings are around 1:55 and the figures are 1:35 or something like that. 1:55 means that the building is approximately 55 times smaller than one in the real world. You have entered the world of scale modelling! As I said a Lemax Village scene is a whimsical scene where although the scales vary in the scene the overall concept is very much a "Feel Good" view. If you like what you have done then you have achieved what all of us aspire to. Creating a scene that means Christmas to you and your visitors.
Introducing Model Trains to your Village
Adding any animation to your village will create a feel of life. Colour and movement will enhance any scene.
The quickest and easiest way to achieve this is by adding a model train to the village, but what scale?
The closest scale and gauge combination is what is known as On30. This is a narrow gauge train built to 1:48 scale made by Bachmann, these were in fact designed to match the Department 56 buildings so perfect for Lemax. They are close enough to look "right". Because it is a model train scale there are many accessories that are available to enhance your village including figures!
Just to clarify what scale and gauge means, the scale is the actual ratio between real life size and the model size. The gauge is a train term, which is the width between the rails. It is common for two modellers to both model a scale but each do a different gauge to represent the width of the rails in the area or a time period.
In Australia, like many countries throughout the world, we have different gauges in different states, sometimes more than one gauge in each state. Common gauges in Australia is 4'8", 5'3", 3'6" 30" and 24" as well as others. Obviously the people are a similar size so a carriage is designed to accommodate real life size people. The track width can vary though and this affects the width of the trains. Imagine a carriage built for a track width of 5'3" being run on track only 30" wide, it would be very top heavy and unstable, so the carriages are built to the ratio of the track width. A perfect example of this in Victoria's "Puffing Billy", it runs on 30" track gauge whereas elsewhere in Victoria the gauge is 5'3". The carriages and locomotives are still made to accommodate real people but are engineered differently, enabling them to operate safely on the narrower track. Narrow gauge or track width was cheaper to build so was popular on lesser traveled lines.
I mentioned On30 trains earlier, this is very much the "Puffing Billy" train. The O denotes the scale of 1:48, the n means a narrow guage, and the 30 tells us that the track gauge or width is 30".
TBC
The Village
Everyone starts their village as a blank canvas, from there each village will be set up for the buildings / animations that they have and area available, so overtime the village morphs into something different as things are added or more space is allocated. Remember that no one judges your village, and any suggestions are just that, if you are happy with your village then it is perfect!
Some of our customers have generously allowed us to show their village, these ones in this page are from 2018, but there are also some from 10+ years ago. The intention is to highlight the facets of the village that for beginners are easy to miss.
How to begin
First step is how much space do you have? A mantle piece or the top of a pool table or even a purpose built room! Determine what limitations for size and get a feel for what may go where. Some of the early things you need to consider are;
1/ Am I going to put in a Lemax train or a model train? The Lemax train has a smaller footprint and is a simple addition, whereas a model train minimum size is usually 90cm x 90cm but the larger the more realistic.
2/ Am I going to have mountains, ski runs, tunnels and different levels. Will I just have a few levels to aid in the display of my buildings / animations. Will I have a seaport scene, a busy township or a bit of both.
3/ Electricals ideally should be planned to avoid having to dig up some of your finished work to add a new addition.
The list can go on, but at least give yourself some basic plan on what you want to achieve!
Starting
The base or platform you are using needs to be solid, most use existing benches etc and don't have to consider this. If however you want to build a platform, I suggest plywood, rather than chipboard or MDF board. The ply is relatively light and will last for years. No matter which material you will need a frame but don't overdo it. See your local hardware and they will suggest a suitable type of frame which will be generally timber. It is easy to work with minimal tools, most of which you probably already have.
I prefer aluminium 25 x 25mm from bunnings for a frame, you can get all the joiner pieces to make up what you need, and it is very light and will last for years. For the village base with this method I suggest foam board, again it light and gives the ability to have levels built into your base, reset a skating pond into it or create a harbour by carving ( or gouging ) a recess where you want it. It glues to itself easily so building different levels is easy.
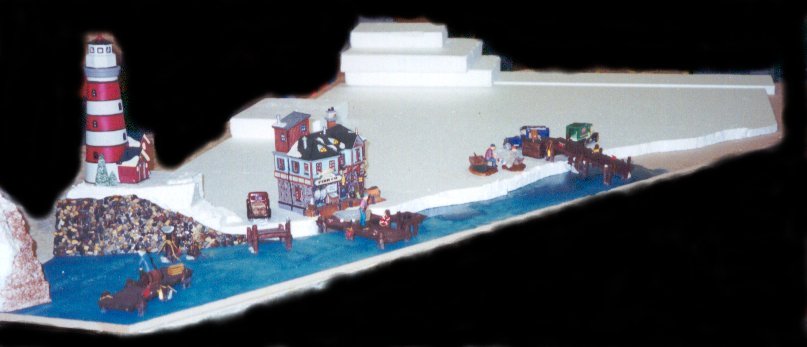
So here we see a basic start allowing for a lighthouse at the front left and at the rear right is a Ski Lift going up to a mountain. The foam sheets are stacked to roughly represent the levels required.
An oval of model train track will be laid, so a tunnel needs to be formed along the back edge. This particular scene is designed to fit in an awkward triangle beneath stairs and was built nearly 20 years ago!
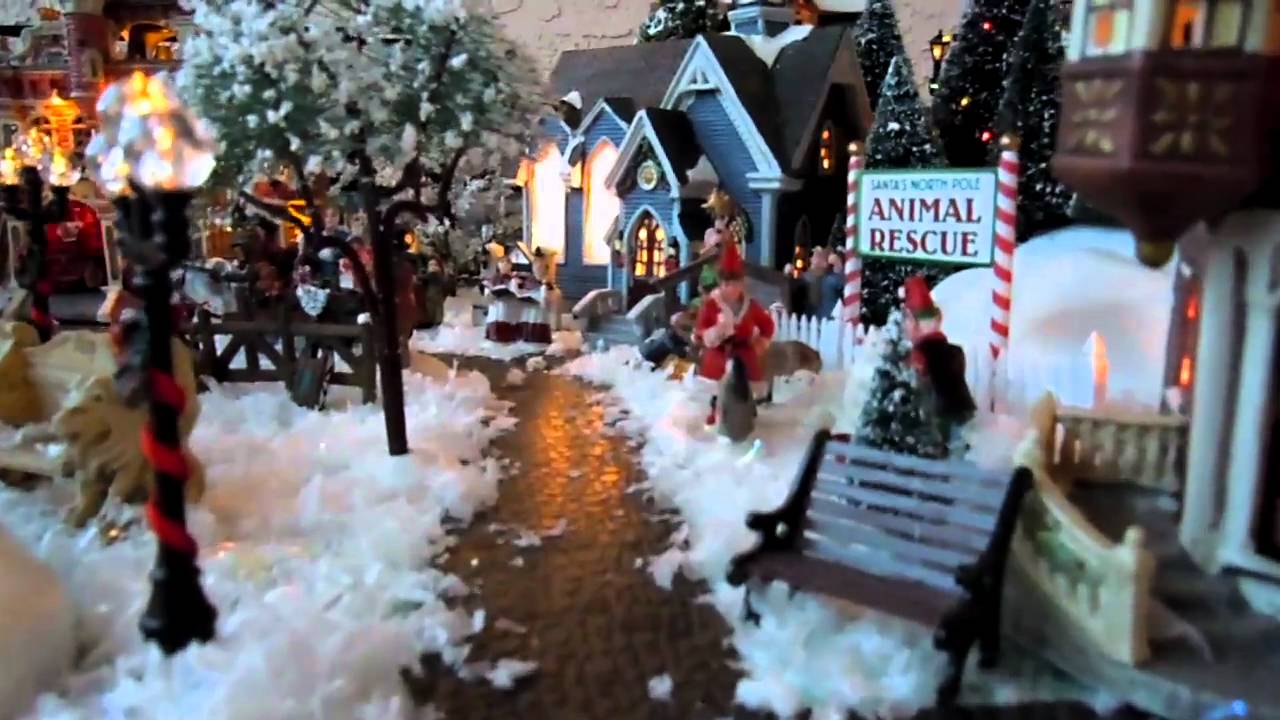
This is an example of a simple trick to make your scene look more realistic. The Lemax Cobble Path has had the edges sprinkled with snow to hide the square edged path look. Often the small touches such as this make the scene "Real"!
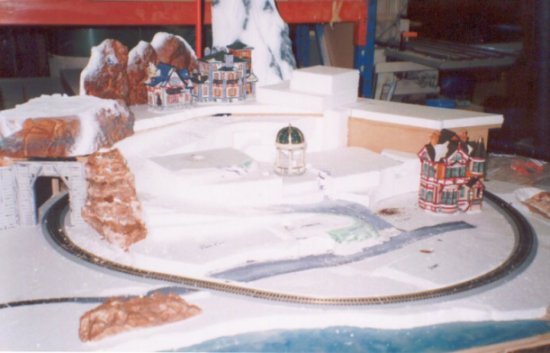
The train track, tunnel and some layers for houses has been added and a road has started to appear. Buildings are placed to get an idea of where things will be. If you look closely there are holes for the lighting coming out of the layers for building lights and power for the Gazebo.
So even now at this stage there is nothing fixed in stone, changes can be made to suit the direction taken. The fun has begun!
This is an example of a simple trick to make your scene look more realistic. The Lemax Cobble Path has had the edges sprinkled with snow to hide the square edged path look. Often the small touches such as this make the scene "Real"!
Adding Lighting To Lemax Buildings
All the newer buildings come with what is called a "Moonlander" bulb and power supply. So one building is one plug. Lemax have created a four moonlander set including wiring to allow four buildings to run off one power supply via a single socket. This 4 Moonlander set is product number 74276, the power supply is any 4.5 volt Lemax Power Supply such as product 94565. The 94565 power supply has three outlets, so this could supply power to 12 Moonlander bulbs ( 12 Buildings, off one power supply ) Brilliant and Simple.
How Lemax product Numbers Work
Ever wonder how you can date a figurine or building?
Lemax has a 5ive digit product number and the first two numbers are;
The year of design / release so the new Winterhaus Resort is number 15735. The first digit is a 1 so it was designed / released in 2001, 2011 or 2021. With a ten year span you can generally pipoint the release date.
The second digit for the Winterhaus Resort is a five.
Figurines second digit will be a 2
Table Top Accents,Scenery and the like have a 3 or 4 second digit
Buildings second digit will be a 5 ( includes Sight and Sounds ) occasionally it is a 4 !!
The remaining three digits are just product numbers in that range.
Hope this helps
Link to our old Hints and Tips Page which will be deleted when this one has been updated.